
Thanks Werner :)
Well, the last two days and nights have been very busy - refraining from computer games frees a lot of time :)
So first I completed the base colors and details of the base.

And then I applied the first black wash.

Since I needed a lot of washing and the base is rather big, I mixed my own wash instead of using precious Badab Black.

The shades slowly came out.

After most of the shades were done I started with some of the highlight effects.

Here you can see the light effects on the wall and on the steps - as well as the shadows Emilia and Berthan will cast.


Looking pretty nice so far.

But I really have a hard time finding the proper light setting to take good photos.

It's really hard to see what is a naturally casted light and shadow and what is painted.

Here you can see the effect I created for the gun flash - in a photo I took outside in daylight.

It looks good, and for a while I thought it was done.

But then I realized it only casts the color, but not the light of the gun flash (thanks to Mastiff for pointing this out).

:(


So I went back and gave the gun flash more "power", so it cast also some light. In addition I darkened some of the shadows, to make the effect more dramatic.

Unfortunately the shadows now cover most of the floor mosaic.

But now the OSL effects are a lot better and the eye is drawn to the two actors.


Here I tried another close up, but the lights make it really hard to see what's painted and what's natural light effects.

:)

I would like to thank Mastiff over at DakkaDakka who pointed out the muzzle flash issue and showed me the trick with the destaurated photo and the light effects:
http://www.dakkadakka.com/dakkaforum/posts/list/390/310208.page#4258712
Take your photo, and desaturate it, so it's just shades of grey. You end up with the following:
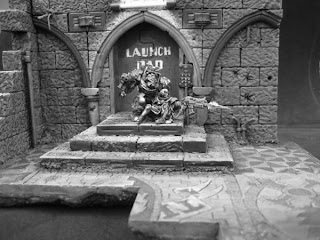
See how the flash disappears? That's what I mean by throwing colour on the wall, but not light. The stone is reflecting the same amount of light whether it's in the flash radius or not, while it should be brighter. Use some white to highlight the bricks, and/or add more dark washes to the walls and floor outside the flash radius. You're aiming for something like this:
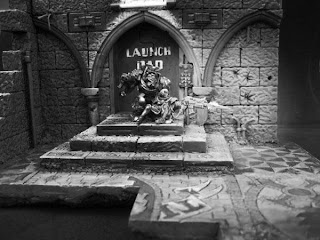
The darker washes will also help focus attention on the two characters, who can get a bit lost in such a large canvas despite the central positioning. I highly recommend viewing images in greyscale, rather than colour, when you're testing the effectiveness of OSL. Before Photoshop I would sketch things out with pencil, but technology is faster and easier. Remember, if you ain't cheatin' you ain't really tryin'.
http://www.dakkadakka.com/dakkaforum/posts/list/390/310208.page#4258712
Take your photo, and desaturate it, so it's just shades of grey. You end up with the following:

See how the flash disappears? That's what I mean by throwing colour on the wall, but not light. The stone is reflecting the same amount of light whether it's in the flash radius or not, while it should be brighter. Use some white to highlight the bricks, and/or add more dark washes to the walls and floor outside the flash radius. You're aiming for something like this:

The darker washes will also help focus attention on the two characters, who can get a bit lost in such a large canvas despite the central positioning. I highly recommend viewing images in greyscale, rather than colour, when you're testing the effectiveness of OSL. Before Photoshop I would sketch things out with pencil, but technology is faster and easier. Remember, if you ain't cheatin' you ain't really tryin'.
This was really helpful, and I wanted to share this tipp with you guys :)
C&C is welcome.
Cheers
Klaus


